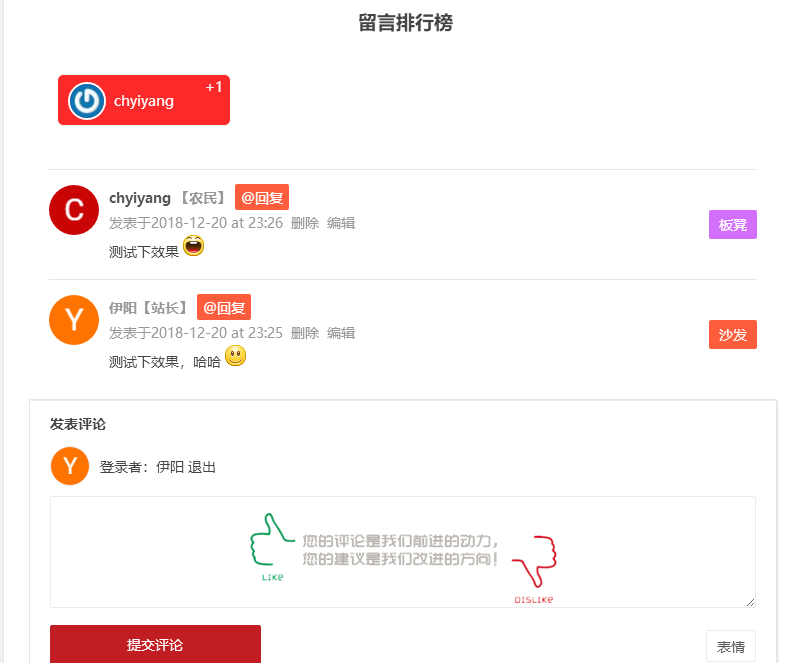
这几天,博客启用了懿古今博主的NANA主题,但是里面没有留言板功能,就想着把之前主题的留言板直接复制过来用,结果是用不成。这不,这几天就把留言板针对NANA主题做了修改适配。
下面我就介绍下方法:
第一步、复制下列代码,并保存为guestbook.php。
<?php
/* Template Name: GuestBook */
get_header();
?>
<div id="content" class="site-content">
   <div class="clear"></div>
     <div id="primary" class="content-area">
	<main id="main" class="site-main" role="main">
	<?php while ( have_posts() ) : the_post(); ?>
	<article id="post-<?php the_ID(); ?>" <?php post_class(); ?>>
	  <header class="entry-header">
	   <h1 class="entry-title"><?php the_title(); ?></h1>
	   <div class="single_info">
	    <span class="date"><?php the_time( 'Y-m-d H:i' ) ?></span>
	    <span class="views"><?php if( function_exists( 'the_views' ) ) { the_views(); print '人阅读 '; } ?></span>
	    <span class="edit"><?php edit_post_link('编辑', '  ', '  '); ?></span>
	   </div>
	 </header><!-- .entry-header -->
	 <div class="entry-content">
	   <?php the_content(); ?>
	   <?php wp_reset_query();endwhile; ?></br>
	 <div id="dzq">
	 <?php
	    $query="SELECT COUNT(comment_ID) AS cnt, comment_author, comment_author_url, comment_author_email FROM (SELECT * FROM $wpdb->comments LEFT OUTER JOIN $wpdb->posts ON ($wpdb->posts.ID=$wpdb->comments.comment_post_ID) WHERE comment_date > date_sub( NOW(), INTERVAL 24 MONTH ) AND user_id='0' AND comment_post_ID ='118' AND comment_author_email != '330601425@qq.com' AND post_password='' AND comment_approved='1' AND comment_type='') AS tempcmt GROUP BY comment_author_email ORDER BY cnt DESC LIMIT 20";
	    $wall = $wpdb->get_results($query);
	    $maxNum = $wall[0]->cnt;
	    foreach ($wall as $comment){
	    $width = round(40/($maxNum / $comment->cnt),2);
	    if( $comment->comment_author_url )
	    $url = $comment->comment_author_url;
	    else $url="#";
	    $avatar = get_avatar( $comment->comment_author_email, $size = '36');
	    $tmp = "<li><a target=\"_blank\" href=\"".$comment->comment_author_url."\" title=\"".$comment->comment_author_url."\">".$avatar."<em>".$comment->comment_author."</em> <span>+".$comment->cnt."</span></br></a></li>";
	   $output .= $tmp;
	   }
	    $output = "<ul class=\"readers-list\">".$output."</ul>";
	    echo $output ;
	  ?>
	</div></br>
        <div id="comments">
            <?php comments_template('/guestcomments.php');?>
        </div>
	</div><!-- .entry-content -->
	</article><!-- #post -->
	</main><!-- .site-main -->
	</div><!-- .content-area -->
	<?php get_sidebar();?>
	<div class="clear"></div>
</div><!-- .site-content -->
<?php get_footer();?>
其中,comment_post_ID =’118′中的“118”为你留言板页面的ID,comment_author_email != ‘330601425@qq.com’,邮箱地址为自己的邮箱,作用是排除自己的留言的显示统计。
第二步、复制Nana\inc\functions\comment-template.php的全部代码,并另存为guestcomments.php。
第三步、将下列css代码复制到主题下的style.css,样式可以自行修改美化。
#dzq{padding:10px 20px 15px 25px;margin-top: 0px;}
.readers-list{line-height:20px;text-align:left;overflow:hidden;_zoom:1}
.readers-list li{width:180px;float:left;margin-right:5px;list-style:none}
.readers-list a{background:#fb2929;}
.readers-list a{position:relative;display:block;height:50px;margin:4px;padding:4px 4px 4px 44px;overflow:hidden;border:#fb2929 1px solid;border-radius:5px;box-shadow:#eee 0 0 2px}
.readers-list img,.readers-list em,.readers-list span{-webkit-transition:all .2s ease-out;-moz-transition:all .2s ease-out;transition:all .2s ease-out}
.readers-list img{width:38px;height:38px;float:left;margin:2px 8px 0px -35px;border-radius:19px;border:#fff 2px solid;}
.readers-list em{font-style:normal;margin-right:10px;line-height:40px;color:#fff}.readers-list span{width:40px;text-align:right;position:absolute;right:6px;top:0px;color:#fff}
.readers-list a:hover{border-color:#fb2929;box-shadow:#ccc 0 0 2px;background-color:#fff;background-image:none}
.readers-list a:hover img{opacity:.7;margin-left:10px;border:#fb2929 2px solid;}
.readers-list a:hover em{color:#FF5E52;margin-right:0}
.readers-list a:hover span{display:block;color:#Fff;right:130px;top:0;text-align:center;border-right:#fb2929 1px solid;height:50px;line-height:47px;background:#fb2929}
最后,在后台新建一页面,名称改为留言板,模版选择GuestBook,保存即可。


效果如下图

上面的统计排行的留言功能,理论上也适用其他的Wordpress主题,至于如何修改,还需自行琢磨,在此,我不做介绍。


 伊阳博客
伊阳博客


最新评论