Hi,
有钱终成眷属
没钱亲眼目睹

技术文章 第3页

WordPress纯代码实现添加下载次数统计功能

伊阳阅读()

本文最后更新于2021年11月7日,已超过 3 年没有更新,如果文章内容或图片资源失效,请留言反馈,我会及时处理,谢谢!

最近,有网友留言问本站的资源下载次数统计功能,本方法及代码我也是从其它主题移植过来的,并根据我的主题进行了适配。今天,我就把方法及主要代码分享出来,以方便有需要的网友使用。

本来想着把主要代码贴出来,但怕有的人不会用,最后想着把全部贴出来,之后又发现代码太长了,影响阅读效果;最终决定就不展示了,需要的在直接下载即可,里面附带使用方法。这里就只展示前天及后台效果。

后端效果

前端效果

上面是后台及文章页的显示效果,下面说下如何调用显示。

1、将下列代码添加到当前主题的functions文件的最后一个?>前。
function _get_post_downs(){
    global $post;
    $post_ID = $post->ID;
    $postdowns = get_post_meta($post_ID, 'post_downs', true);
    return $postdowns ? $postdowns : '0';
}
2、将下列代码,粘贴到你想显示的位置。
<?php echo _get_post_downs() ?>

效果图

注意:下面的下载包里,没有上面的两段代码

群晖安装nextcloud提示SQLSTATE[HY000] [1045] 的处理方法

伊阳阅读()

本文最后更新于2022年9月17日,已超过 2 年没有更新,如果文章内容或图片资源失效,请留言反馈,我会及时处理,谢谢!

最近由于家里停电,我的蜗牛黑群晖起不来了,没办法又给重新安装了下黑裙,因为的我系统盘和数据盘公用一个硬盘,之前安装的nextcloud也就没有了,然后就按之前的方法打算重新安装nextcloud,安装过程中出现了一些错误,也都一一解决了,唯独下面这个错误让我弄了老长时间,好在最后终于给解决了。

安装过程中,报错如下:Error while trying to create admin user: Failed to connect to the database: An exception occurred in driver: SQLSTATE[HY000] [1045] Access denied for user ‘oc_chyiyang’@’localhost’ (using password: YES),产生的原因是:错误产生的原因是oc_chyiyang用户没有localhost登录的权限。

解决方法如下:

一、通过phpMyAdmin登录数据库,并按照图中所示输入下列sql命令。

create user nextclouduser@localhost identified by 'Nextcloudpasswd@1';
grant all privileges on nextcloud_db.* to nextclouduser@localhost identified by 'Nextcloudpasswd@1';
flush privileges;
需要注意的是:nextcloud@localhost是nextcloud_db数据库的用户名,Nextcloudpasswd@1是nextcloud_db数据库密码,且密码必须由大写字母、小写字母、数字、符号组成,否则会报错。

好了,再次安装nextcloud应该不会再出现1045错误了。

Dynamic Routing OSPF CLI 配置

伊阳阅读()

本文最后更新于2021年3月31日,已超过 4 年没有更新,如果文章内容或图片资源失效,请留言反馈,我会及时处理,谢谢!

A 路由配置
user:admin
Power:private
(Router)>enable
(Router)#configure
(Router)(Config)#interface 2/1
(Router)(Interface 2/1)#ip address 10.0.1.1 255.255.255.0
(Router)(Interface 2/1)#routing
(Router)(Interface 2/1)#exit
(Router)(Config)#interface 2/2
(Router)(Interface 2/2)#ip address 10.0.2.1 255.255.255.0
(Router)(Interface 2/2)#routing
(Router)(Interface 2/2)#ip ospf
(Router)(Interface 2/2)#exit
(Router)(Config)#router ospf
(Router)(Config router)#enable
(Router)(Config router)#router-id 10.0.2.1
(Router)(Config router)#redistribute connected subnets
(Router)(Config router)#exit
(Router)(Config)#ip routing
(Router)(Config)#exit
(Router)#show ip ospf
B 路由配置
user:admin
Power:private
(Router)>enable
(Router)#configure
(Router)(Config)#interface 2/2
(Router)(Interface 2/1)#ip address 10.0.3.1 255.255.255.0
(Router)(Interface 2/1)#routing
(Router)(Interface 2/1)#exit
(Router)(Config)#interface 2/1
(Router)(Interface 2/2)#ip address 10.0.2.2 255.255.255.0
(Router)(Interface 2/2)#routing
(Router)(Interface 2/2)#ip ospf
(Router)(Interface 2/2)#exit
(Router)(Config)#router ospf
(Router)(Config router)#enable
(Router)(Config router)#router-id 10.0.2.2
(Router)(Config router)#redistribute connected subnets
(Router)(Config router)#exit
(Router)(Config)#ip routing
(Router)(Config)#exit
(Router)#show ip ospf

群晖系统上给Nextcloud安装Imagick

伊阳阅读()

本文最后更新于2022年9月17日,已超过 2 年没有更新,如果文章内容或图片资源失效,请留言反馈,我会及时处理,谢谢!
php7.4已自带imagick扩展,不需要在自行安装

去年趁着蜗牛热,入手了一台A款,之后给装上了黑群系统。再之后呢,又通过WebStation安装了Nextcloud私人网盘,登录系统后台,在安全与设置警告中,总是提示缺失imagick模块,作为一个强迫症患者,提示这样的警告信息,对于我而言,是无法忍受的。好在经过高人的指点,终于给成功了,今天我就在这里介绍下方法,以备广大有需之士有所帮助。

一、PHP imagick扩展模块的安装。

1、下载PHP imagick扩展模块。
2、通过Winscp软件登陆到你的群晖,并将imagick上传到如图所示位置。

经测试,此方法只能配合PHP7.2使用

3、修改imagick文件的权限。

4、在/volume1/@appstore/PHP7.2/misc下的php-fpm.ini文件最后一行添加如下代码。

extension = imagick.so
二、安装ImageMagick套件

1、安装第三方套件源

http://packages.synocommunity.com/


2、在第三方套件源里安装ImageMagick套件。

如果ImageMagick套件无法安装,可手动进行安装,套件附后。

三、在WebStation中,Nextcloud选择PHP7.2。


自此,Nextcloud中将不会再提示imagick模块了。

群晖系统上如何切换PHP版本

伊阳阅读()

本文最后更新于2022年9月17日,已超过 2 年没有更新,如果文章内容或图片资源失效,请留言反馈,我会及时处理,谢谢!

前段时间,给我的黑裙上安装了Nextcloud,在后台安全与设置警告提示:数据库丢失了一些索引。由于给大的数据表添加索引会耗费一些时间,因此程序没有自动对其进行修复。您可以在 Nextcloud 运行时通过命令行手动执行 “occ db:add-missing-indices” 命令修复丢失的索引。索引修复后会大大提高相应表的查询速度。

通过SSH执行”sudo -u http php occ db:add-missing-indices”命令后,提示”This version of Nextcloud requires at least PHP 7.2
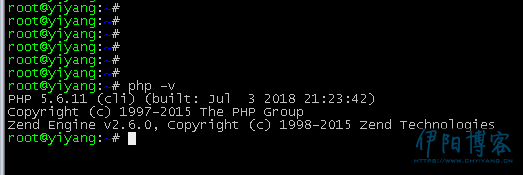
You are currently running 5.6.11. Please update your PHP version.”,意思是PHP版本太低,至少需要PHP7.2。可我明明卸载了php5.6.11,怎么还会运行呢

通过SSH连接群晖,输入命令php -v,查看当前php版本。

通过命令查询后可以看到,群晖的php版本还是PHP5.6。在网上找了很久,终于让我找到了方法,方法不是很详细,下面我就详细介绍下方法。

1、软件件需要用到WinSCP,通过WinSCP连接到你的群晖。

按照下图分别输入你的群晖IP地址,用户名及密码,然后点击登录。

2、下面以切换到PHP7.3为例,将/volume1/@appstore/PHP7.3/usr/local/bin下的php73复制到/bin下。

3、将原/bin下的php重命名为php1,然后将复制的php73重命名为php,并更改权限为755。

最后,通过SSH连接到群晖,输入命令:php -v,显示PHP版本已切换到7.3,如图。

WordPress纯代码实现百度收录数据库保存及定时更新

伊阳阅读()

本文最后更新于2021年3月31日,已超过 4 年没有更新,如果文章内容或图片资源失效,请留言反馈,我会及时处理,谢谢!
本文于2020年4月12日进行修正,并增加了360收录查询的保存及定时更新

网站文章实现百度收录的查询和显示网上的方法很多,有通过插件实现的,也有通过纯代码进行实现的,但都存在同样的问题:实时查询,一是加载速度会慢,二是可能被封服务器IP。所以我自己做了一个本地数据库版的,将查询结果保存到本地,从本地读取显示,当查询结果大于设定的时间后,自动进行查询结果更新。

本方法可实现查询结果自由显示,可在后台文章列表显示,也可在文章也显示,取舍可自行决定。

1、编辑WordPress主题functions文件,将下列代码放到?>标签之前。
/*
==================================================
*百度收录查询、本地保存、定时更新 
*https://www.chyiyang.cn/139.html
==================================================
*/
//在数据库创建自定义表,用于存储百度收录查询数据;
function my_table_install () {   
    global $wpdb;
    $table_name = $wpdb->prefix . "record";  //获取表前缀,并设置新表的名称
    if($wpdb->get_var("show tables like $table_name") != $table_name) {  //判断表是否已存在
        $sql = "CREATE TABLE " . $table_name . " (
	    id mediumint(9) NOT NULL AUTO_INCREMENT,
	    post_id bigint(20) UNSIGNED NOT NULL DEFAULT '0',
	    record_time datetime DEFAULT '0000-00-00 00:00:00' NOT NULL,
	    record_name tinytext NOT NULL,
	    value text NOT NULL,
	    UNIQUE KEY id (id)
          );";
        require_once(ABSPATH . "wp-admin/includes/upgrade.php");  //引用wordpress的内置方法库
        dbDelta($sql);
    }
}
my_table_install ();

function checkBaidu($url) { 
    $url = 'https://www.baidu.com/s?wd=' . urlencode($url); 
    $curl = curl_init(); 
    curl_setopt($curl, CURLOPT_URL, $url); 
    curl_setopt($curl, CURLOPT_RETURNTRANSFER, 1); 
    $rs = curl_exec($curl); 
    curl_close($curl); 
    if (!strpos($rs, '提交网址')) { //没有找到说明已被百度收录 
        return 1; 
    }else{return 0;}
}
function checkssl($url) { 
    $url = 'https://www.so.com/s?q=' . urlencode($url); 
    $curl = curl_init(); 
    curl_setopt($curl, CURLOPT_URL, $url); 
    curl_setopt($curl, CURLOPT_RETURNTRANSFER, 1); 
    $rs = curl_exec($curl); 
    curl_close($curl); 
    if (!strpos($rs, '找不到该URL')) { //没有找到说明已被360收录 
        return 1; 
    }else{return 0;}
}

function baidurecord($surl){
    global $wpdb;
    $post_id =get_the_ID();
    $days = 7;
    $today = current_time('mysql'); //获取今天日期时间
    $daysago = date( "Y-m-d H:i:s", strtotime($today) - ($days * 24 * 60 * 60) );  //Today - $days
    $results1 = $wpdb->get_results("SELECT * FROM wp_record where post_id = '$post_id' and record_name = 'baidu_record'");
    if(empty($results1)){
       if(checkBaidu($surl)==1 ){
	   $data = array('post_id'=> $post_id,'record_time'=> $today,'record_name'=> 'baidu_record','value'=> '1',);
           $wpdb->insert($wpdb->prefix ."record",$data);
	   return 1;
       }
	else {
	   $data = array('post_id'=> $post_id,'record_time'=> $today, 'record_name'=> 'baidu_record','value'=> '0',);
           $wpdb->insert($wpdb->prefix ."record",$data);
	   return 0;
       }
     }
     else {
        $results2 = $wpdb->get_results("SELECT value FROM wp_record WHERE record_time > '$daysago' and post_id = '$post_id' and record_name = 'baidu_record'");
           if(empty($results2)){
	     if(checkBaidu($surl)==1 ){
		$data1 = array('record_time'=> $today,'value'=> '1');
                $data2 = array('post_id'=> $post_id,'record_name' => 'baidu_record' );
             	$wpdb->update($wpdb->prefix ."record",$data1,$data2);
		return 1;
	     }else{
		$data1 = array('record_time'=> $today,'value'=> '0' );
             	$data2 = array('post_id'=> $post_id,'record_name' => 'baidu_record');
             	$wpdb->update($wpdb->prefix ."record",$data1,$data2);
		return 0;
	     }
	}
	else{			
	  if($results2[0]->value == 1){return 1;}
	  else{return 0;}
	}
    }
}

function sslrecord($slurl){
    global $wpdb;
    $post_id =get_the_ID();
    $days = 7;
    $today = current_time('mysql'); //获取今天日期时间
    $daysago = date( "Y-m-d H:i:s", strtotime($today) - ($days * 24 * 60 * 60) );  //Today - $days
    $results1 = $wpdb->get_results("SELECT * FROM wp_record where post_id = '$post_id' and record_name = '360_record'");
    if(empty($results1)){
	if(checkssl($slurl)==1 ){
	   $data = array('post_id'=> $post_id,'record_time'=> $today, 'record_name'=> '360_record','value'=> '1',);
           $wpdb->insert($wpdb->prefix ."record",$data);
	   return 1;
	}
	else {
           $data = array( 'post_id'=> $post_id,'record_time'=> $today, 'record_name'=> '360_record','value'=> '0', );
           $wpdb->insert($wpdb->prefix ."record",$data);
	   return 0;
	}
    }
    else{	
        $results2 = $wpdb->get_results("SELECT * FROM wp_record WHERE record_time > '$daysago' and post_id = '$post_id' and record_name = '360_record'");
        if(empty($results2)){
	   if(checkssl($slurl)==1 ){
		$data1 = array('record_time'=> $today,'value'=> '1');
                $data2 = array('post_id'=> $post_id,'record_name' => '360_record' );
             	$wpdb->update($wpdb->prefix ."record",$data1,$data2);
		return 1;
	   }else
		{
		$data1 = array('record_time'=> $today,'value'=> '0' );
             	$data2 = array('post_id'=> $post_id,'record_name' => '360_record');
             	$wpdb->update($wpdb->prefix ."record",$data1,$data2);
		return 0;
	   }
	}
	else{
	    if($results2[0]->value == 1){return 1;}
	    else{return 0;}
	}
    }
}

function baidu_record() {
    if(baidurecord(get_permalink()) == 1) {
        echo '<a>百度已收录</a>';
   } else {
        echo '<a style="color:red;" rel="external nofollow noopener noreferrer" title="点击提交,谢谢您!" target="_blank" href="http://zhanzhang.baidu.com/sitesubmit/index?sitename='.get_permalink().'">百度未收录</a>';
   }
}
function ssl_record() {
    if(sslrecord(get_permalink()) == 1) {
        echo '<a>360已收录</a>';
   } else {
        echo '<a style="color:red;" rel="external nofollow noopener noreferrer" title="点击提交,谢谢您!" target="_blank" href="http://info.so.com/site_submit.html">360未收录</a>';
   }
}

数据库效果图

2、编辑当前主题下的文章模板(一般是single.php),在想要显示收录结果的位置添加如下代码并保存:
 <?php echo baidu_record(); ?>

如果不想给其他人看到这个收录情况,可以加上一个判断语句,具体代码如下:

<?php if ( is_user_logged_in()){baidu_record();ssl_record();}?>
3、如果想在后台文章列表显示百度收录情况的话,将下来代码放到主题functions文件最后一行的?>之前。
//1~ 在后台文章列表增加1列数据,展示百度收录情况
add_filter( 'manage_posts_columns', 'yy_customer_posts_columns' );
function yy_customer_posts_columns( $columns ) {
  $columns['baidurecord'] = '百度收录';
  $columns['baidurecord'] = '360收录';
  return $columns;
}
 
//2~ 输出查询结果
add_action('manage_posts_custom_column', 'yy_customer_columns_value', 10, 2);
function yy_customer_columns_value($column, $post_id){
    if($column=='baidurecord'){
	$baidurecord = $wpdb->get_var("SELECT value FROM wp_record WHERE post_id = '$post_id' and record_name = 'baidu_record'");
	if($baidurecord == 1) {
            echo Yes;
        }else{echo No;}
	}
    if($column=='sslrecord'){
	$sslrecord = $wpdb->get_var("SELECT value FROM wp_record WHERE post_id = '$post_id' and record_name = '360_record'");
	if($sslrecord == 1) {
            echo Yes;
        }else{echo No;}
	}
    return;
}

后台文章列表效果图

好了,方法大致就是上面这些,代码可能存在bug,后续有时间再进行优化,写的不好敬请见谅~~

ErphpDown插件优化(三)

伊阳阅读()

本文最后更新于2021年3月31日,已超过 4 年没有更新,如果文章内容或图片资源失效,请留言反馈,我会及时处理,谢谢!

既上次优化了erphpdown前端文章页显示下载次数后,本次优化主要是针对后台文章列表栏,添加自定了列-下载次数,并进行显示。下面介绍一下方法。

一、在erphpdown插件目录的includes\show.php下,大概第23行之后加入下列代码。
$postdowns=get_post_meta($postsid, 'post_downs', true);
global $wpdb, $wppay_table_name;
$down_total  = $wpdb->get_var("SELECT COUNT(id) FROM $wppay_table_name WHERE order_status=1 And post_id = $postsid");
if(!$postdowns && $down_total > 0){ 
   update_post_meta($postsid,'post_downs',$down_total);
}else if($down_total > $postdowns){
   update_post_meta($postsid,'post_downs',$down_total);
}
二、在主题目录的functions.php的?>之前加入如下代码。
//1~ 在后台文章列表增加1列数据,展示下载数
add_filter( 'manage_posts_columns', 'customer_posts_columns' );
function customer_posts_columns( $columns ) 下载次数
  $columns['postdowns'] = '下载次数';
  return $columns;
}
 
//2~ 输出下载次数
add_action('manage_posts_custom_column', 'customer_columns_value', 10, 2);
function customer_columns_value($column, $post_id){
     if($column=='postdowns'){
        $down_count = get_post_meta($post_id,'post_downs',true); 
	if(!$down_count) {
            $down_count = 0;
	  }
	  echo $down_count;
    }
    return;
}

效果图

此方法之适合免登陆下载,其它不适用

赫斯曼交换机开启 IGMP 功能

伊阳阅读()

本文最后更新于2022年8月22日,已超过 2 年没有更新,如果文章内容或图片资源失效,请留言反馈,我会及时处理,谢谢!
一、在浏览器输入交换机管理 IP 地址,进入交换机登录界面


在 Login 输入用户名 admin,在 Passward 输入密码 private 回车进入交换机配置界面

二、进入 Switch->Multicasts->IGMP 界面,如下图所示:

在Operationt 选项下勾选On

三、进入Basic Settings->Load/Save 界面

选择Save->to Device,点击Save 按钮保存。

赫斯曼交换机交叉Vlan配置

伊阳阅读()

本文最后更新于2022年8月22日,已超过 2 年没有更新,如果文章内容或图片资源失效,请留言反馈,我会及时处理,谢谢!

例如:Port1.1、Port1.2 属于VLAN2;Port1.4、Port1.5 属于VLAN3;Port1.3 属于VLAN4;VLAN4可以与VLAN2 和VLAN3 通讯

VLAN 出口表(Egress table)

Web,Switching->VLAN->Static

VLAN 入口表(Ingress table)

Web,Switching->VLAN->Port
QQ20191216192413.jpg

WordPress主题纯代码添加下载功能

伊阳阅读()

本文最后更新于2022年8月5日,已超过 2 年没有更新,如果文章内容或图片资源失效,请留言反馈,我会及时处理,谢谢!

上周考完二级造价师后,这周闲来无事,想着好久没有折腾博客了,思来想去就把下载功能给折腾了下。之前我用的是仿知更鸟的下载功能,虽然在功能上完善了一些,但还是存在一些不合理的地方。最近也在用erphpdown的插件,看到其中的一个功能比较好,就想着把它移植过来,经过两天的修改、测试,终于完美适配博主的主题。

本下载功能主要包括4个文件,分别是down.css、download.php、down.php、down-setting.php。

down.css  //下载页面的样式;
download.php  //下载页面文件;
down.php  //文章页下载信息显示文件;
down-setting.php  //后台下载信息设置文件;

由于代码较多,在这里我就不贴了,这4个文件下载地址,我放在文章末尾,下载后按照里面的说明步骤部署即可。

后端效果

文章页显示效果

下载页面效果

说明:本下载功能原则上适合所有WordPress主题,唯一的缺点是下载页位置导航因为每个人所用主题不一样,可能存在显示不完整的问题,请用爱去忽视它,或自行修改以适配自己的主题。